Automated irrigation system manual
Install, run, and maintain a sensor-driven crop-steering irrigation system on Home Assistant, explained from zero.
Purpose and scope
This is an automated watering system for plants grown in pots of soil-less media. Sensors buried in each pot measure how wet the media is and how much fertiliser salt it holds, and the software decides when and how much to water. That replaces watering by hand or on a ‘dumb’ timer.
The whole setup runs inside Home Assistant, free open-source home-automation software that you run yourself, with no cloud account required for the core system. It controls 6 grow tables at once. The system is built in three layers you can adopt in order: a time-based irrigation package and a sensor-driven crop-steering integration that both run today, plus an optional advanced layer (AppDaemon) for fully autonomous decisions.
The three-layer design lets you start simple and add intelligence later without rebuilding. Run it on a plain timer for the first week while you learn to trust the sensors, then switch on crop steering once the readings look sane.
- Replaces hand-watering and plain timers with sensor-driven decisions across 6 grow tables
- Runs on Home Assistant; no cloud account or extra software needed for the core system
- Three layers: time-based package, crop-steering integration, and optional AppDaemon autonomy
- Start timer-based and add intelligence later without rebuilding
Definitions
These are the words this manual uses constantly. You don't need to memorise them, each one comes back in context.
Evidence and limitations
We've gone to great lengths to keep these guides honest. One of the main ways we do that is self-review: we actively look for claims that are subjective, only lightly backed by literature, or based on grower practice rather than a controlled study — and we call those out instead of dressing them up as settled science.
Often there simply is no paper for the decision you're making. In those cases we're drawing on what other growers report and what has worked in our own rooms. That can still be useful — but it is not a lab proof. Do what works for your plants, your room, and your meters. If a table disagrees with your crop, believe the crop and log the difference.
- Missing safety sensors mean do not run unattended
- Vegetative vs generative dryback polarity (smaller vs larger controlled drybacks)
- Install and maintenance procedures for a sensor-driven manifold
- Any facility's entity names and setpoints as plug-and-play for yours
See something glaringly wrong? Tell us and we'll fix it. Please open a GitHub issue with the paper name and what looks off (include a source if you have one): Report an accuracy issue. Local law, labels, and licences always override any recipe here. Inline notes labelled grain of salt flag the highest-risk over-trust points in the text.
Irrigation system hardware
The brain of the valve control is a KC868 E16S relay board connected over Ethernet and running ESPHome firmware. It physically switches every valve: the 6 tables plus the mains, mainline, and manifold valves.
Each table has a substrate probe that reads VWC, EC, and temperature over SDI-12, a simple digital protocol for soil sensors. The room is also covered by 4 environmental sensors, 3 CO2 sensors, 4 AC units, a humidifier, and 4 dehumidifier relays. There is no pump switch: the pump auto-starts on a pressure switch the moment the mainline valve opens, so water flows tank → mainline → table dripper → plant.
The mains-water and manifold valves exist only to fill and mix the nutrient tank. The plants are fed exclusively through the table valves. A few sensors are intentionally not yet connected, which has safety consequences covered in the last section.
| Device | What it does | Connection |
|---|---|---|
| KC868 E16S relay board | Switches all valves (tables, mains, mainline, manifold) | Ethernet / ESPHome |
| Substrate probes (×6) | Read VWC, EC, temperature, one per table | SDI-12 |
| Environmental sensors (×4) | Room temperature and humidity | ESPHome / Wi-Fi |
| CO2 sensors (×3) | Room CO2 in ppm | ESPHome |
| AC units (×4) | Cooling | Relay / IR |
| Humidifier | Raises room RH | Relay |
| Dehumidifiers (×4) | Lower room RH, staggered | Relay |
| Lights | Photoperiod, sets lights-on window | Relay / schedule |
P0–P3 irrigation phases
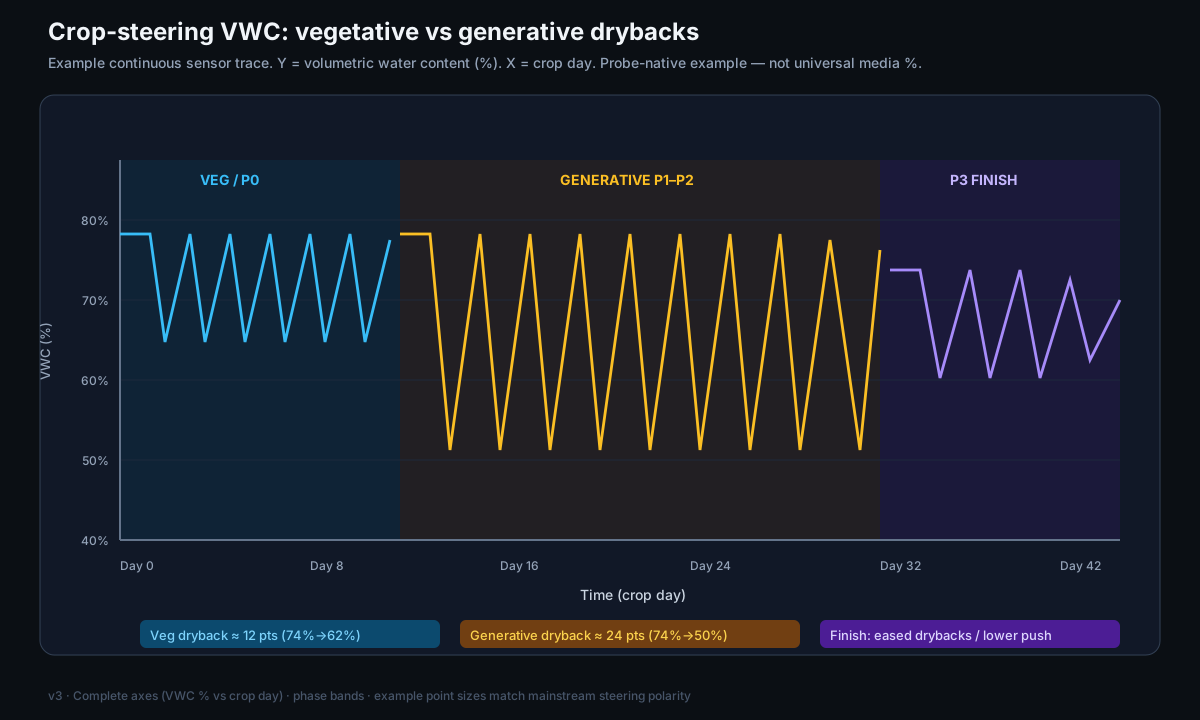
Crop steering splits each lights-on day into four phases that control how the plant uses water and nutrients. A controlled dryback, letting the media dry by a set amount before watering again, is the signal that steers the plant toward vegetative root growth or generative flower production.[2]
P0 (morning dryback) is no watering at all, letting the media dry from overnight. It moves to P1 once VWC drops by the target amount (50% in vegetative, 40% in generative) or after a 120-minute cap. P1 (ramp-up) gives progressively larger shots, starting at 2% of substrate volume and rising 0.5% each shot, 15 minutes apart, up to 10 shots, until VWC hits roughly 65%.
P2 (maintenance) holds the media steady with top-up shots when VWC drops below 60%, and nudges that threshold up or down based on EC: if the EC ratio exceeds 1.2 it waters more to flush salts, and below 0.8 it lets the media dry to concentrate nutrients. P3 (pre-lights-off) is emergency-only watering below 40% VWC before an overnight dryback resets the cycle.
- Vegetative steering uses smaller drybacks and moderate EC to encourage root and leaf growth.
- Generative steering uses larger controlled drybacks and/or higher root-zone EC to push flowering.[1]
- The same P0–P3 framework runs both. Only the dryback targets and EC change.
Environmental controls and safety interlocks
The system manages room climate as well as watering. Dehumidifiers turn on when humidity is 5% above target (the 4 relays stagger on with 10-second delays to avoid an inrush spike) and off 2% below. The humidifier mirrors that logic. CO2 injects when 50 ppm below target and only during lights-on, always closing at lights-off.
Several independent safety layers run in parallel so that one failure never leaves valves open. The master gate only allows irrigation when the system is enabled, not in maintenance mode, no leak detected, tank OK, and the clock is inside the time window. A valve watchdog force-closes any table valve open longer than 3 minutes, a daily 3 AM audit closes everything as a reset, and maintenance mode shuts all valves instantly.
No single check is trusted on its own. If the master gate logic ever passed a bad decision, the valve watchdog and the daily audit would still close the valves. Treat these layers as non-negotiable and do not disable them to ‘simplify’ the system.
| Protection | What it does | Automatic? |
|---|---|---|
| Master gate | Blocks all irrigation unless enabled + not-maintenance + no-leak + tank-OK + in-window | Yes |
| Valve watchdog | Force-closes any table valve open over 3 minutes | Yes |
| Mains watchdog | Force-closes the mainline valve open over 24 minutes | Yes |
| Leak abort | Stops all irrigation if a leak is detected | Yes (when sensor fitted) |
| Tank-low abort | Stops irrigation if the tank float reads low | Yes (when sensor fitted) |
| Maintenance mode | Closes all valves instantly; blocks new shots | Manual toggle |
| Sensor-offline alert | Warns when a probe or device drops offline | Yes |
| Daily 3 AM audit | Force-closes all valves and CO2 as a daily reset | Yes |
| CO2 lights-off close | Always stops CO2 injection at lights-off | Yes |
Commissioning procedure
Bring the system up in order so each layer is proven before the next one is switched on. Rushing straight to crop steering on unverified hardware is the fastest way to flood a table.
- 1Verify hardwareConfirm every probe and the relay board show Online in ESPHome. Check a table VWC sensor reads a sensible number (e.g. 47.4), not a dash or zero.
- 2Test every valveManually click each valve on, then immediately off, to confirm it responds. Toggle the mainline briefly to confirm the pump auto-starts on pressure.
- 3Set the windowSet the irrigation window (e.g. start 08:30, 30 min after lights-on; end 18:00, 2 hours before lights-off), interval 60 minutes, duration 60 seconds.
- 4Enable the systemFrom the Command Center, enable the system, switch maintenance mode off, and enable only the tables you actually want to water.
- 5Run one test cycleRun a single cycle and watch the valves open and close one at a time. Confirm water reaches the drippers and runoff appears.
- 6Set climate & steeringSet day/night temp and humidity targets and a CO2 target. Optionally choose a steering mode and crop profile once watering is proven.
| Setting | Conservative starting value |
|---|---|
| Window start | 08:30 (30 min after lights-on) |
| Window end | 18:00 (2 h before lights-off) |
| Interval | 60 minutes |
| Shot duration | 60 seconds |
| Day / night temp | 26 °C (79 °F) day / 22 °C (72 °F) night |
| Humidity (RH) | 60% |
| CO2 target | 1200 ppm |
Daily operation and dashboard
Daily checks are quick. On the Command Center, all 6 tables should read VWC between 30 and 70%, EC in your target range (typically 2 to 6 mS/cm by stage), and substrate temperatures 20 to 26 °C (68 to 79 °F), with every safety indicator green.
On the Trends tab the VWC graph should show a sawtooth: a gradual drop, then a sharp rise after each irrigation. A flat or only-falling line means watering is not actually happening. That is your first warning sign, before any error message appears.
- Healthy daily readings: VWC 30–70%, EC ~2–6 mS/cm, substrate temp 20–26 °C (68–79 °F), safety all green
- A non-sawtooth VWC trace is your earliest signal that something is wrong
- Enable or skip tables via the Enabled toggle in Zone Control
- Emergency stop: toggle Maintenance Mode on (closes all valves) or call the emergency-stop script
| Tab | What it shows | When to use it |
|---|---|---|
| Command Center | All tables at a glance: VWC, EC, temp, safety | Daily health check |
| Zone Control | Per-table enable toggles and manual valves | Add or skip a table |
| Trends | VWC / EC graphs over time | Confirm the sawtooth; diagnose |
| Environment | Room temp, RH, CO2 and their targets | Tune climate |
| Schedule | Window, interval, duration settings | Adjust timing |
Troubleshooting
Most problems are diagnosable from a short checklist. Work top to bottom, because the cheapest checks (is it on? is the window open?) catch the most cases.
If irrigation will not run, confirm the system is on, maintenance mode is off, the clock is inside the window, at least one table is enabled, and the irrigation-allowed binary sensor reads on. If VWC or EC shows Unavailable, check the ESPHome device is online and reload template entities. If the raw probe value is also missing, the probe has lost its connection. Reliable VWC depends on a working dielectric sensor, so a flatlined raw value points at the probe, not the software.[3]
Run time-based scheduling for about a week while watching VWC trends before switching to sensor-driven crop steering. Confirm the sensors track reality first. Calibration drift in cheap probes is common and skews every decision built on top of it.[4]
| Symptom | Likely cause | First action |
|---|---|---|
| Irrigation won't run | System off, maintenance on, outside window, or no table enabled | Check system on, maintenance off, inside window, a table enabled, irrigation-allowed sensor on |
| VWC / EC Unavailable | ESPHome device offline or template entity stale | Confirm device online, reload template entities, then suspect a lost probe connection |
| Shots show 0.0 s | Substrate volume or dripper flow not set; known prefix bug | Set substrate volume (10 L / 2.6 gal) and dripper flow (2 L/hr / 0.5 gal/hr); check for crop_steering_ prefix bug |
| Stuck-open valve | Relay latched or watchdog not firing | Maintenance mode first, turn the valve off via service, then cut power to the relay board |
| Entity not found | Integration looking for crop_steering_ prefixed entities | Verify entity IDs match; the known prefix bug can hide volume / flow-rate inputs |
| Parameter | Meaning | Default | How to measure |
|---|---|---|---|
| Substrate volume | Litres of media per pot | 10 L (2.6 gal) | Pot volume × fill fraction |
| Dripper flow rate | Water delivered per dripper per hour | 2 L/hr (0.5 gal/hr) | Stamped on the dripper / catch test |
| Drippers per plant | How many emitters feed one plant | 1–2 | Count physically |
| Field capacity | Wettest VWC before runoff | 70% | Saturate, drain, read the sensor |
Expected results and limitations
The core system automates timing and sensor-driven decisions, but it is only as good as its sensors and plumbing. Until the tank float switch and leak sensor are physically installed, the tank-low and leak emergency aborts are hardcoded to ‘safe’ and will not trigger, so do not run the system unattended in that state.
Two more honest limits. Without a leaf-temperature sensor, VPD falls back to room air temperature and is less accurate. The fully autonomous P0–P3 phase transitions need the optional AppDaemon layer, which is not deployed by default. Budget about a week of supervised, timer-based running before you trust the automation.
| Not-yet-connected sensor | Impact while missing |
|---|---|
| Tank float switch | No tank-low abort: pump can run a dry tank |
| Leak sensor | No leak abort: a leak will not stop irrigation |
| Tank pH / EC probes | Tank pH and EC show Unavailable; mix by hand |
| Leaf-temperature sensor | VPD falls back to room air temp; less accurate steering |
Start by reading one normal day on the Trends tab, then change one thing at a time. For the biology behind the dryback and the P0–P3 rhythm, read the crop steering in coir paper; for how the probe actually measures the root zone, see the root-zone sensor guide.
References
- Caplan, D., Dixon, M., & Zheng, Y. (2019). Increasing inflorescence dry weight and cannabinoid content in medical cannabis using controlled drought stress. HortScience, 54(5), 964-969. https://doi.org/10.21273/HORTSCI13510-18
- Yang, B., Fu, P., Lu, J., Ma, F., Sun, X., & Fang, Y. (2022). Regulated deficit irrigation: an effective way to solve the shortage of agricultural water for horticulture. Stress Biology, 2, 28. https://doi.org/10.1007/s44154-022-00050-5
- Topp, G. C., Davis, J. L., & Annan, A. P. (1980). Electromagnetic determination of soil water content: Measurements in coaxial transmission lines. Water Resources Research, 16(3), 574-582. https://doi.org/10.1029/WR016i003p00574
- Mane, S., Das, N., Singh, G., Cosh, M., & Dong, Y. (2024). Advancements in dielectric soil moisture sensor calibration: A comprehensive review of methods and techniques. Computers and Electronics in Agriculture, 218, 108686. https://doi.org/10.1016/j.compag.2024.108686
Citations marked in-text as [n] map to this list. Primary literature and official guidance except where noted. Cannabis tissue culture is strongly genotype-dependent, verify dilutions, hormone doses and local regulations against the primary sources before relying on them.